The beautiful thing about coloring is that it can be as simple or as complicated as you want to make it. Either way, you can still come out with a great result. As a beginner, it’s best to initially focus on laying down even, consistent colors in your coloring books. You’re work may appear basic colored without any fancy coloring techniques, but as you practice you’ll be able to incorporate more complex techniques and color combinations into your work. This guide will introduce you to a few practices and give you an opportunity to explore the technical aspects of coloring.
What are Coloring Techniques?
After learning the basics of how to use a colored pencil or marker, coloring techniques are specific skills you can use to make your art even better. Coloring techniques will let you add texture and depth to your work and make things look more realistic. There are tons of different techniques you can use, and depending on what you’re coloring and how you want it to look, some may be better than others. By mastering lots of coloring techniques, you won’t only improve the quality of your art, but also expand your ability to make art in different styles.
Here are some of the most important techniques to master. If you’re comfortable with the basics and the theory and just want to learn the skill, click the name of each technique to skip ahead in the post:
Colored Pencil Techniques
Colored pencils are arguably the most popular medium to color with. They are cheaper than pens and markers and there is a huge variety of different brands and types to choose from. It’s easy to find a decent set of colored pencils without breaking the bank; in fact, most people have an old set of Crayolas lying around the house somewhere! This section of the guide will help you learn how to get the most out of your colored pencils, whether you are just starting out or you’ve been coloring for years.
Looking for a pencil recommendation? Check out our interactive list of the best colored pencils for coloring!
Beginner Level
So you just got your first coloring book when it hits you – you haven’t touched a colored pencil since grade school. Have no fear! This section will tell you everything you need to know to start coloring the right way.
Holding Your Pencil
It may seem silly (who doesn’t know how to hold a colored pencil?), but your grip can have a huge effect on your work. It’s important to be comfortable, especially when going for those multiple-hour marathon coloring sessions. Additionally, the amount of pressure you use can affect what the final colors look like.
To start, hold your pencil as you would if you were writing. There should be a little bit of space between your fingers and the pencil tip. As you color, you may notice your grip starting to tighten. This will end up causing you some pain in the long run, and you’ll notice your hand cramping up after a while. Remember to keep your grip controlled but relaxed – you may not be able to color as fast, but you will be able to last much longer without any cramps or sore fingers. In most cases, coloring is a marathon, not a sprint.
Keeping your hand towards the tip of the pencil should feel more natural, and it will give you more control. It’s a great grip for coloring little details, as you can carefully move the point of your pencil into the tiny nooks and crannies between lines. However, don’t be afraid to try moving your hand towards the back of the pencil sometimes. When you grip the pencil further back, you can color in a wider arc and cover a larger area of the page. What you lose in control, you gain in mobility. This is a great grip for laying down a lot of color in a short amount of time.
Hiding Pencil Strokes
Getting bold, even colors with colored pencils can be difficult, even with Prismacolors or Faber Castell pencils. Beginners often find that their large back-and-forth strokes can be hard to hide. Different areas meet up at awkward angles, and can look patchy up against one another. There are certain techniques you can use to help solve this problem.
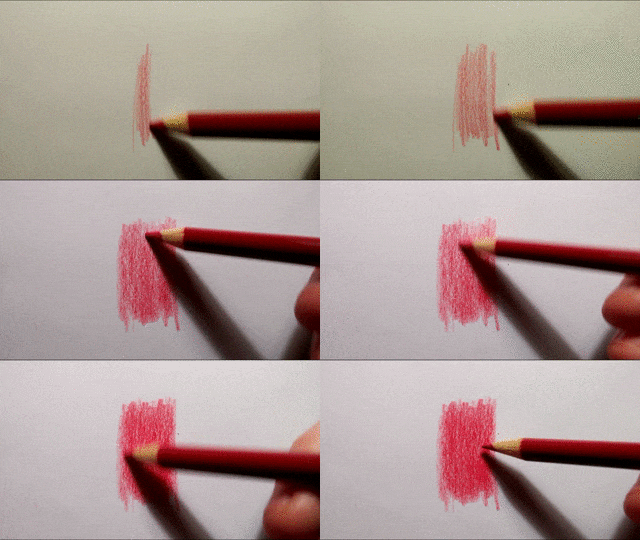
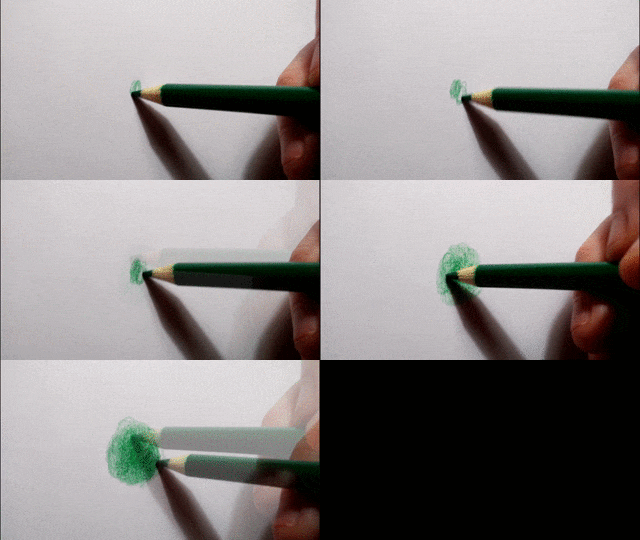
Coloring in the same direction is quick, but changing direction often will give you a better result in the end.
Change Direction Often
Many colorists recommend coloring in small circles, and while this is a great method, it’s not the only way to achieve even colors. The important thing is to return to old pencil strokes and go over them again, but in a different direction. If you always color back-and-forth as you move your pencil across the page, you end up with a grainy, directional texture in your colors. This is noticeable on its own, but becomes especially glaring when two different areas with different directional textures meet up.
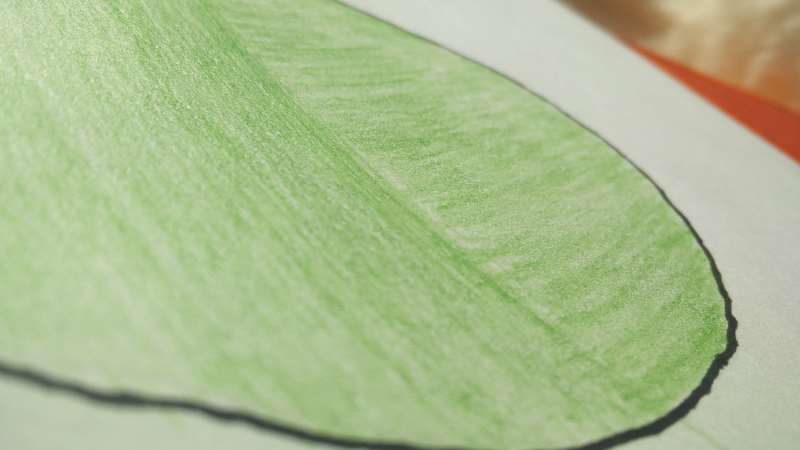
Coloring in the same direction becomes problematic when two areas come together
So however you want to do it, always make sure to go back over your filled-in areas and lay down color in a different direction. The circle method achieves this quite nicely, as the tip of the pencil always tends to be moving in a different direction. This makes it easy to color around a corner or fill in large areas without it becoming noticeable.
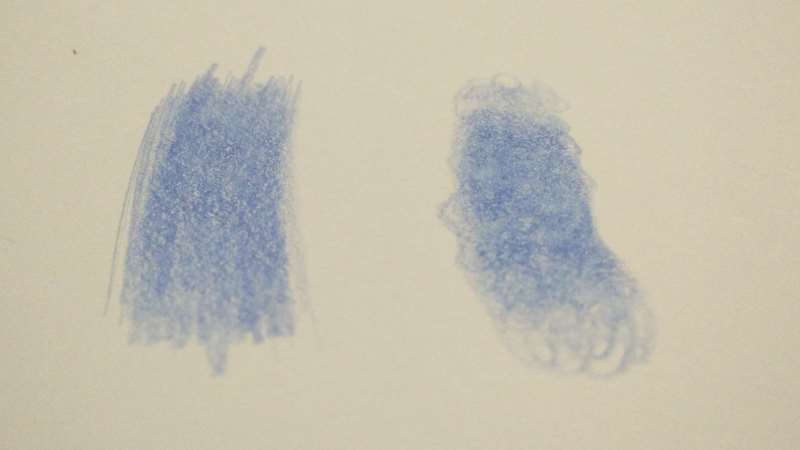
There doesn’t appear to be much difference at first…
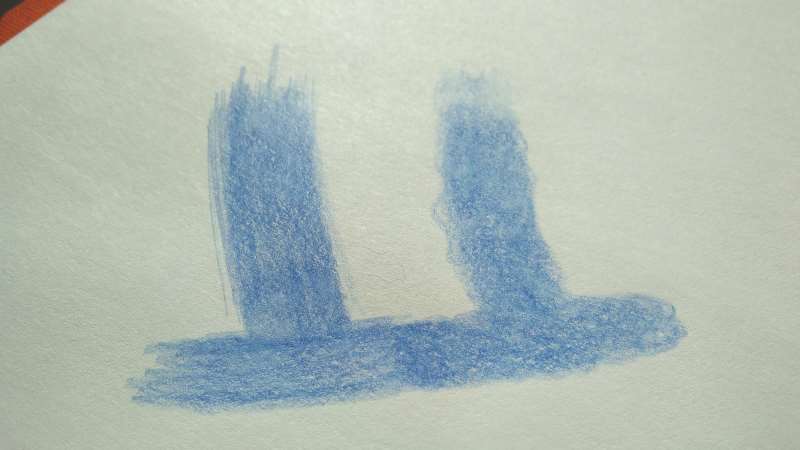
…but the textures become visible when different areas meet up.
It seems tedious at first, but the circle method will keep your finished work looking crisp and clean. Coloring in the same direction is quick and will look good at first, but you may end up with a rougher result. Remember, the important thing is just to vary your pencil’s direction, whether you use circles, figure eights, hearts, or whatever shape works for you!
Cross Hatching
Coloring in many different directions is a great habit to get into. However, there are still ways to hide your pencil marks while using linear strokes. If you plan accordingly, you can use linear strokes in one area, and then use more linear strokes in a different direction to go back over your pencil marks. This technique is called cross hatching.
Cross hatching is a great technique to know because it lets you use those quick, straight strokes that are quick and easy to lay down. This method does have some limitations, though. The end result often appears very flat – if you are trying to make an object appear round or add depth to your coloring, cross-hatching is not the way to do it. It is difficult to use multiple colors when cross hatching, as the individual markings become more visible where different colors meet and overlap.
Getting Bold Colors
Many colorists eventually complain about the grainy white paper texture that always seems to remain in their art. This texture is mostly unique to colored pencils, since pens, markers, and other “wet” media are better at saturating the page with pigment.
The Tooth of the Paper
When you run a colored pencil across a page, the pigment core breaks into tiny particles that stick onto microscopic ridges on the paper. These ridges are called “teeth”, and the amount of tooth a page has directly affects how much pigment can be applied to it. Pages with a lot of tooth have deep ridges that can be filled with more pigment. As a result, less whiteness shows through, and the colors appear bolder and richer.
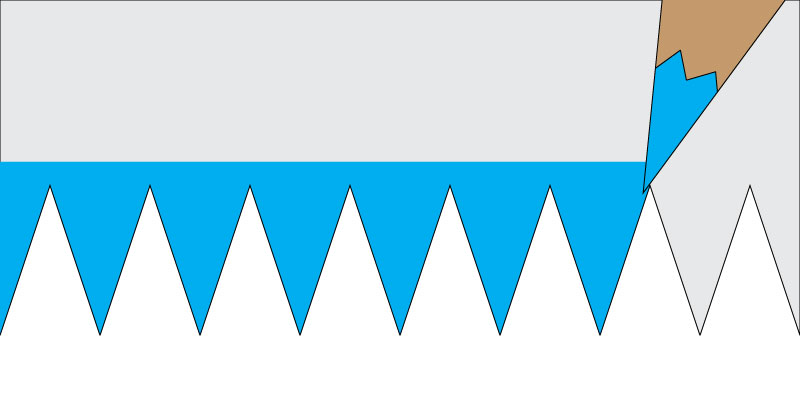
The paper’s tooth determines how much pigment it can ultimately hold
Tooth is not the only thing that determines how bold your colors will be. One of the most important factors in getting smooth colors is repetition. You’ll need to go back over your work again and again to make sure you fill every last nook and cranny with pigment. It’s easier to do this on pages with more tooth, since they can accept more pigment, but it’s possible to do on normal copy paper with enough persistence.
Keeping Colored Pencils Sharp
Keeping a sharp point on your pencil is the best way to force color into the tiniest cracks of the page. A fine tip means that you won’t apply color to as large an area at once. However, it will also mean that you can force pigment deep into the areas that would otherwise remain white (and later create the white grainy texture you’re trying to hide).
Colored pencils are different from writing pencils, and they need to be sharpened differently. Always use a manual sharpener; while electric sharpeners are quicker, it is much easier to over-sharpen a pencil and waste your precious pigment. Colored pencil “lead” is softer than that of a regular pencil, and it can gum up the works of your electric sharpener, causing damage to the mechanism.
When sharpening your pencils, hold them with the point facing upwards. Keep the pencil held firmly in one hand while twisting the sharpener with the other. With luck, you should see one long, unbroken pencil shaving coming out of the sharpener. If not, you may have a dull sharpener that is causing damage to your colored pencils. Keep checking the tip of the pencil until it is nice and sharp, and then stop! There’s no point in sharpening a sharp pencil – all you’re doing at that point is wasting pigment that could otherwise be used for coloring.
Read our in-depth sharpening guide to learn everything you need to know about sharpening colored pencils.
Intermediate Level
So you’ve been coloring for a bit and have a good grasp on colored pencils. Your work is looking good, but you want to take it to the next level. You want your colors to pop and your finished pages to look like those pictures that get hundreds of likes and shares on Facebook and Instagram. Well you’ve come to the right place! Grab your favorite pencils and get ready to learn some intermediate coloring techniques.
Blending and Shading
One of the most popular colored pencil techniques that beginner colorists want to learn is blending. Blending involves creating a gradient where one color gradually becomes another. Shading is similar to blending, but involves a single color gradually becoming lighter or darker. The gradient refers to the actual transition – a gradient can be harsh and transition very quickly, or soft and transition over a longer period.
Advanced and intermediate colorists use blending and shading to add dimension to their coloring and prevent the final work from looking flat. You can use gradients to imitate the way light shines on an object, creating the illusion of depth. When done correctly, it can make a coloring page look amazing – but when done incorrectly, it often looks worse than an un-shaded piece. The important thing is to take your time, and practice often.
Pressure Shading
The simplest form of shading can be done with a single color, and involves varying the pressure you put on your pencil to apply more pigment to the page as you color across the gradient.
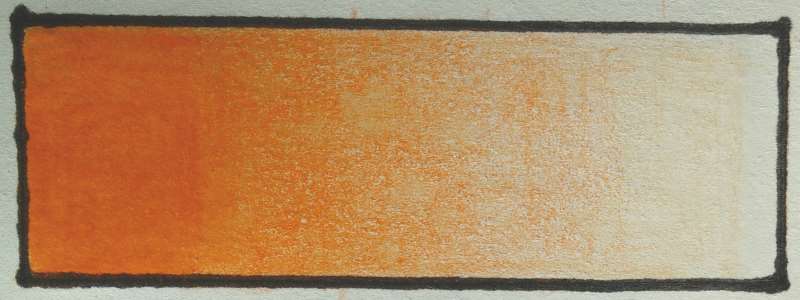
Use more pressure to apply more pigment to the page as you go across the gradient
You always want to work from the lighter area to the darker area when shading. It is simple to add pigment to the page if needed, but much more difficult to take it off. It can also be tough to hide your pencil strokes toward the lighter end of the gradient, since you’re trying to avoid laying down too much color. You can’t go back over your strokes to mask them since the area needs to stay light. A white colored pencil can come in handy to help hide those pencil marks in lighter areas.
Blending Multiple Colors
The same principles behind pressure shading can be used to blend two or more colors together. Simply fill the gradient with one color as you would when shading, then repeat the process for the other color on the opposite side. The most advanced colorists are masters of this art, and blend intriguing combinations of colors to get unique and eye-catching results.
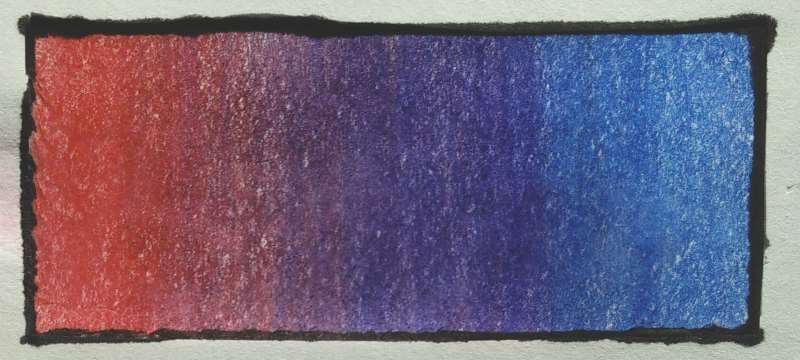
Pressure shade from either side using a different colored pencils to blend two colors together
When blending, you also always want to move light to dark, but this refers more to the value of the colors. Adding a darker pigments on top of lighter ones tends to be much more effective than the other way around. Regardless of what colors you are blending, you’ll most likely switch back and forth between the two quite before you’re finished blending. If you’re blending two very different colors together, you can use extra colors to correctly implement the corresponding color wheel transition. We’ll get more into that in the next section
Burnishing
As you keep applying color to the same spot, you’ll eventually get to the point where nothing more can be added. The area will take on a waxy shine and will have a different feel as you color over it. This technique is called burnishing.
Burnishing is a great way to get very solid colors with little to no graininess. However, once an area has been burnished, there’s no going back. The page cannot accept any more pigment, so the burnished color is pretty much set in stone. Make sure you have the right shade and hue before you burnish the page.
Advanced Level
You’re a colored pencil expert. There are no two colors that you can’t blend together. Your finished pages are the envy of colorists all across the internet. But you still want more! Well you’re in luck – these advanced techniques will open your eyes to the cutting edge of colored pencil coloring.
Blending With Solvents
To get the incredibly bold and vivid blends many colorists strive for, you’re going to need something more than just colored pencils. You’re going to need a solvent.
Solvents help move the pigment across the page, creating even blends and beautiful transitions. Some are used after the color is already on the page, and some are applied directly while coloring. The solvent provides a medium for the pigment to travel through, similar to how watercolors work. There are even watercolor pencils meant to blend this way. Solvents also help get the pigment into the tightest cracks between the teeth of the page, helping to remove the grainy texture from showing through. While each solvent is used differently, most are either applied to the tip of your pencil or rubbed over your pencil strokes after you’ve finished coloring.
If you are using a thicker substance like Vaseline, try using a very small amount to coat the tip of your pencil. Avoid using to much, as it can cause damage to the paper or cause it to wrinkle and curl when drying. When you go to color, you should notice that your pencil glides smoothly across the page and lays down color more evenly. As you cover a wider area, you should notice less white poking through. When you reach an area that you’ve already colored, you can use your pencil to bring in some of the colors you’ve already laid down, blending as you go. Once your finished, be sure to let the solvent dry before touching your work or closing your coloring book.
Thinner substances like mineral spirits are generally applied after you’re finished coloring. Using a piece of cloth or a cotton swab, take a small amount of the solvent and rub it over your pencil strokes. This will help even out the pigment and remove the grainy texture of the white paper underneath the colored pencil. You can even use a q-tip to get a little more control over where you’re spreading your solvent. If you go over an area where you’ve blended to colors, you can help mix the two different colors more evenly. The wet solvent lets the dry pigment particles move around on the page, letting two different colors mix together.
Read our in-depth guide to learn even more about blending colored pencils with solvents.
How can I improve my coloring skills?
- Change up the direction of your strokes and go back over your work to create even and consistent colors that don’t show pencil marks.
- Keep your pencil sharp in order to force pigment deep into the paper and get richer, bolder colors.
- Preventing the underlying color of the page from showing through takes a lot of time and repetition.
- Use pressure to add more pigment to the page when shading, but avoid applying too much too quickly. The tooth of the paper will only take so much pigment.
- Always apply the brighter colors first when blending. Darker pigments will show up clearly on lighter pigments, but it doesn’t work as well the other way around.
- When blending, some find it easier to create several evenly-spaced blocks of color, each a slightly different color than the last. You then find yourself making many simple blends rather than one drastic blend. It also helps keep the transition evenly spaced.
Perfecting Your Coloring Skills
Practice is probably the best way to get better at the few coloring techniques we covered here, but you can also learn a lot by watching your fellow colorists. YouTube is going to be your best friend when it comes to seeing exactly how to apply certain techniques and discovering new ones to try out.
You can also enhance your coloring without improving your physical skills by learning a bit of color theory. A little knowledge of how colors play off one another can really help accentuate your work. However, creative coloring stands out more than strictly technical coloring, so don’t be afraid to try out some color schemes that don’t adhere to the color wheel.

